
Guides
How to Use a Digital Piano as a MIDI Controller (Easy Setup)
A digital piano with weighted keys can be a superb controller for software instruments, from sampled grands to strings and synths. Once it is connected, a few settings decide how good it feels. This guide covers what MIDI the piano sends, how to set Local Control, velocity curves and channels, and how to keep delay low.
Quick Answer
To use a digital piano as a MIDI controller, connect its USB to Host port to your computer, select the piano as the MIDI input in your music software, and load a software instrument. Turn Local Control off so only the software sounds, set a velocity curve that suits your touch, and lower the audio buffer to reduce delay.
How this guide was put together
This guide is based on manufacturer manuals, published specifications and widely used audio reference standards. Mandrillis does not run hands-on tests for these guides, so treat figures as typical values and check the manual for your own gear before changing settings.
Why Use a Digital Piano as a Controller
Most MIDI controllers have light keys. A digital piano gives you a full 88 key weighted action, which feels much better for playing software pianos.
You also keep a complete instrument for practice when the computer is off. One keyboard can do both jobs in a small room.
- Weighted 88 key feel for software pianos.
- Built-in sound for practice without a computer.
- Sustain pedal already included.
- One keyboard instead of two.
What MIDI Your Piano Sends
MIDI is a set of messages, not sound. When you play, the piano sends which note you pressed, how hard, and when you let go.
It also sends pedal data. The sustain pedal is sent as a control message, often called CC64.
- Note on and note off for every key.
- Velocity, from 1 to 127, for how hard you play.
- Sustain pedal as CC64.
- Soft and sostenuto pedals on some models.
- Program changes when you switch sounds, on some pianos.
Getting Connected
Most digital pianos connect with a single USB cable from the USB to Host port to the computer. Older models may need a USB MIDI interface on their 5-pin MIDI Out port.
Our guide on connecting a digital piano to a laptop covers cables, drivers and ports in detail. This guide focuses on what to do once the piano is connected.
Key Settings for Controller Use
The settings that matter most and where to find them.
| Setting | Where to change it | Recommended starting point |
|---|---|---|
| Local Control | Piano menu | Off when using software sounds |
| MIDI input | Music software preferences | Select your piano |
| Velocity curve | Piano touch setting or software | Normal, then adjust by feel |
| Audio buffer size | Software audio settings | 128 or 256 samples |
| MIDI channel | Piano menu and software track | Channel 1 on both |
Step 1: Set Up Your Music Software
Open your recording software or standalone piano app. In the preferences, find the MIDI section and turn on your piano as an input.
Create an instrument track, load a software piano or other instrument, and arm or select the track. Press a key and watch the meter move.
Step 2: Turn Local Control Off
With Local Control on, the piano plays its own sound and sends MIDI at the same time. You hear both the piano and the software, which can sound doubled.
Turn Local Control off in the piano's settings. The keys then only send MIDI, so you hear just the software instrument. Remember to turn it back on, or restart the piano, when you want its own sound again.
Step 3: Match the Velocity Curve
Every action feels different, and software pianos respond to velocity in their own way. If soft playing sounds too loud, or loud playing never reaches full volume, the velocity curve needs adjusting.
Ways to Adjust Velocity
Try these in order and play the same passage after each change.
- Change the piano's touch setting between light, normal and heavy.
- Use the velocity curve setting inside the software instrument.
- Use a MIDI velocity tool on the track in your recording software.
- Aim for very soft notes near 20 to 30 and loud notes near 110 to 127.
Step 4: Reduce Delay
Delay, or latency, is the gap between pressing a key and hearing the software. Above about 10 milliseconds, many players start to notice it.
Lower the audio buffer size to 128 or 256 samples. On Windows, an audio interface with its own driver usually gives much lower delay than the computer's built-in sound.
- Close other apps while playing.
- Use a wired connection rather than Bluetooth MIDI.
- Raise the buffer again only if you hear crackles.
- Freeze or bounce heavy tracks to free up processing.
Step 5: Map the Pedals
The sustain pedal works automatically with most software pianos. If it works backwards, use the invert option in the software or check the pedal polarity.
Some software lets you map the soft or sostenuto pedal to other controls, such as volume swells for strings. Look for a MIDI learn feature.
What You Give Up Compared With a Dedicated Controller
Most digital pianos have no pads, knobs, sliders or transport buttons. Producers who mix, launch clips or control synth settings often miss these.
A common setup is a digital piano for playing plus a small pad or knob controller beside it for quick control of the software.
Recording MIDI and Editing It
One big benefit of MIDI is that you can fix mistakes after recording. You can move a wrong note, adjust timing or change velocity without playing the part again.
You can also swap the sound later. A part recorded with a piano sound can be changed to strings or an electric piano in a few clicks.
Comfort and Setup Tips
Place the computer screen at eye level and slightly to one side so you can see both the keys and the software. Keep cables tidy and out of pedal range.
Use headphones at a moderate volume for long sessions, and take short breaks every 30 minutes to rest hands and eyes.
Choosing Software Instruments
Many recording programs include a basic piano and other instruments for free. They are a good place to start before you buy anything.
Large sampled pianos can need several gigabytes of storage and a fair amount of memory. Check the system needs before installing, and keep sample libraries on a fast drive so notes load without gaps. Lighter modeled pianos use less storage and can suit older laptops better.
- Start with the instruments included in your software.
- Check storage and memory needs first.
- Try lighter modeled pianos on older computers.
- Use the same velocity checks with each new instrument.
The Bottom Line
Connect the piano by USB, select it as the MIDI input and load a software instrument. Turn Local Control off, tune the velocity curve and lower the buffer size.
A weighted digital piano makes an excellent controller for software pianos. Add a small pad or knob controller if you need knobs and pads for production.
Pianos and Controllers From Our Reviews
Digital pianos with USB MIDI, plus a dedicated 88 key MIDI controller for comparison.
Roland FP-30X
Mentioned
Who Should Buy It
- You want the best action under the FP-60X without compromise elsewhere
- You stream backing tracks over Bluetooth and record over USB
- You gig and need line outs plus two headphone jacks
Skip It If
- Weight and depth are the constraint; the PX-S1100 is lighter and slimmer
- You prefer the Kawai sound signature
- You never leave the house and want a console with three pedals built in
We may earn a commission at no extra cost to you.
Last verified: October 2026
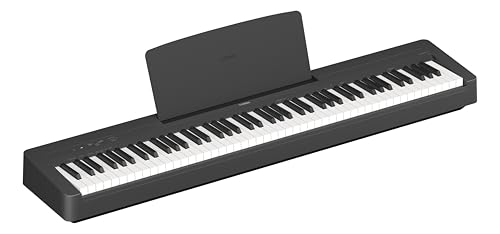
Yamaha P-145
Mentioned
Who Should Buy It
- You are buying a first piano and want the newest entry-level Yamaha
- Space is tight and you need a shallow, light instrument
- You practice with play-along tracks from a phone
Skip It If
- You already play intermediate repertoire with heavy pedaling
- You need line outs for stage or recording use
- You want more than ten sounds
We may earn a commission at no extra cost to you.
Last verified: October 2026

M-Audio Hammer 88 MIDI Keyboard Controller
Mentioned
Who Should Buy It
- Players who want full-size weighted hammer-action keys across 88 keys
- Beginners who want a free 3-month Skoove subscription to start learning
- Producers who want a bundled software suite including MPC Beats and Ableton Live Lite
- Anyone who wants sustain, expression and soft pedal inputs
Skip It If
- You need pads for finger drumming
- You require a dense, named bank of DAW mixing controls
- You already own the bundled software and do not value that part of the purchase
We may earn a commission at no extra cost to you.
Last verified: November 2026
Keep Reading
Related guides and picks on Mandrillis:
- Best MIDI Keyboards : dedicated controllers compared
- How to Connect a Digital Piano to a Laptop : cables, ports and drivers
- Best Audio Interfaces : lower delay for software instruments
FAQs
About This Guide
Daniel Brooks
Daniel Brooks edits the buying guides and how-to articles at Mandrillis. He works from manufacturer manuals, published specifications and common owner questions to explain music and audio gear in plain language, from turntables and headphones to digital pianos and electronic drums.
Read our full research methodology.