
Guides
How to Set Gain Staging on an Audio Interface (Easy Guide)
Gain staging means setting healthy levels at each point in your signal chain, starting at the interface. Get it right and recordings are clean, with no hiss or distortion. This guide explains the target levels in plain words, a step-by-step method, and how to keep levels healthy while mixing.
Quick Answer
To set gain staging on an audio interface, play or sing at your loudest part and raise the gain until peaks reach about minus 10 to minus 6 dB on your recording software's meter. Average levels should sit around minus 18 dB. Never let the clip light turn red. Record at 24-bit so you have plenty of headroom.
How this guide was put together
This guide is based on manufacturer manuals, published specifications and widely used audio reference standards. Mandrillis does not run hands-on tests for these guides, so treat figures as typical values and check the manual for your own gear before changing settings.
What Gain Staging Means
Every piece of audio gear has a sweet spot, where the signal is strong enough to sit well above noise but not so loud that it distorts. Gain staging is setting each step of your chain inside that sweet spot.
The first and most important step is the interface's input gain. If it is wrong, nothing later in the chain can fully fix it.
- Too low: hiss and noise become noticeable when you turn it up later.
- Too high: clipping, a harsh distortion that cannot be undone.
- Just right: clean signal with room for loud moments.
Understanding the Meter
Recording software meters show level in dBFS, decibels relative to full scale. The top of the meter is 0 dBFS, the loudest digital level possible. Anything above it clips.
Numbers below zero are negative. Minus 6 dB is louder than minus 18 dB. It helps to think of minus numbers as distance below the ceiling.
- 0 dBFS: the ceiling, never reach it.
- Minus 6 dB: a safe loud peak.
- Minus 18 dB: a healthy average level.
- Below minus 30 dB: usually too quiet.
Target Recording Levels
Starting points for 24-bit recording. Adjust for very dynamic sources.
| Measurement | Target | Why |
|---|---|---|
| Loudest peaks | About minus 10 to minus 6 dB | Leaves headroom for surprises |
| Average level | About minus 18 dB | Clean, with space for mixing |
| Clip light | Never lit | Clipping cannot be removed later |
| Bit depth | 24-bit | Plenty of range at lower levels |
| Very dynamic singer | Peaks near minus 10 dB | More room for sudden loud notes |
Step-by-Step: Setting Gain on Your Interface
Follow these steps for each microphone or instrument. Turn headphones and monitors down before you start.
Step 1: Start With the Gain Down
Turn the input gain knob to its lowest point. Connect your mic or instrument and turn on phantom power only for condenser mics.
Step 2: Perform at Your Loudest
Sing, speak or play the loudest part of what you will record. Do not test at a whisper, or your level will be too high when you get loud.
Stay at the distance you will use for the real take.
Step 3: Raise the Gain Slowly
Turn the gain up while performing until the loudest peaks reach about minus 10 to minus 6 dB on the software meter.
Many interfaces have a small light that turns green for signal and red for clipping. Keep it out of the red.
Step 4: Record a Test
Record 30 seconds and play it back. Listen for distortion on loud parts and hiss in quiet parts.
If anything clipped, lower the gain a little and test again.
Why 24-Bit Recording Helps
Older 16-bit recording needed levels close to the top to avoid noise. Modern 24-bit recording has a much wider range, so you can record a little lower without adding noise.
This means there is no need to push levels close to zero. Leaving more headroom is safer and sounds just as clean.
Gain Staging With More Than One Mic
When two or more people record at once, set each input on its own. Ask each person to speak or play at their loudest, one at a time, and set their gain separately.
Then record everyone together for a short test. Loud and quiet voices need different gain settings, so do not copy one knob position to all inputs.
- Label each input with tape so knobs are not mixed up.
- Give each person their own headphone mix if the interface allows.
- Keep each person at a steady distance from their mic.
- Recheck levels if anyone changes seats or mics.
Gain Staging Inside Your Software
Gain staging continues after recording. Plugins, especially analog style ones, often behave best when the signal reaching them sits around minus 18 dB.
Use each track's input trim or a gain plugin to bring levels back to that range before adding effects.
Keep the Mix Bus Healthy
As you add tracks, the total level on the master bus rises. Pull track faders down rather than turning the master fader down at the end.
Aim for master bus peaks around minus 6 dB before any final mastering.
Common Gain Staging Mistakes
These mistakes cause most noisy or distorted home recordings.
- Setting gain while speaking softly, then clipping when loud.
- Recording very low to be safe, then boosting a lot later.
- Turning up headphone volume instead of setting input gain.
- Using the software fader to fix clipping that happened at the input.
- Changing mic distance after setting the gain.
Input Gain vs Output Volume
Input gain controls the recording level. Output and headphone volume only control how loud you hear it.
Turning up your headphones does not make the recording louder. Set the input gain first, then adjust headphones to a comfortable level.
Special Cases
Some sources need a slightly different approach.
- Low output dynamic mics: may need high gain or an inline booster.
- Loud drums or guitar amps: may need a pad switch, often minus 10 or minus 20 dB.
- Electric guitars and basses: use the instrument or Hi-Z setting.
- Keyboards and drum machines: use the line setting.
The Bottom Line
Set gain while performing at your loudest, aim for peaks around minus 10 to minus 6 dB and averages near minus 18 dB, and record at 24-bit.
Keep the clip light off, then hold healthy levels in your software as you mix. Good gain staging is the cheapest upgrade in any home studio.
Audio Interfaces From Our Reviews
Compact interfaces with clear gain knobs and input meters for easy level setting.
Behringer U-PHORIA UMC204HD USB Audio Interface
Mentioned
Who Should Buy It
- Solo singer-songwriters tracking vocals and one instrument at a time
- Podcasters or streamers who want two phantom-powered combo inputs
- Musicians who want MIDI In and Out without a separate interface
- Buyers who want a straightforward budget interface from an established name
Skip It If
- You need four or more simultaneous inputs
- You require a confirmed software bundle before buying
- You need a dedicated high-impedance instrument input and none is stated
We may earn a commission at no extra cost to you.
Last verified: November 2026
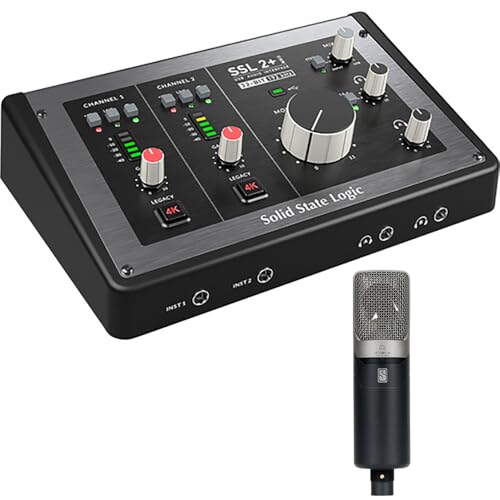
Solid State Logic SSL 2+ MKII
Mentioned
Who Should Buy It
- Podcasters and solo producers who want a bundled condenser microphone alongside their interface
- Musicians who want Legacy 4K analog enhancement for console style coloring on their recordings
- Buyers who want MIDI I/O built directly into their interface rather than needing a separate MIDI box
- Producers who want zero-latency monitoring with stereo loopback for streaming or voiceover work
Skip It If
- You need more than 2 simultaneous mic inputs for a larger session
- You already own a condenser microphone and do not want to pay for a bundled one
- You need a confirmed preamp gain figure in decibels before purchase
We may earn a commission at no extra cost to you.
Last verified: November 2026

Yamaha Steinberg URX22C USB-C Audio Interface
Mentioned
Who Should Buy It
- Singer-songwriters tracking vocals and one instrument at a time
- Podcasters or streamers who want onboard reverb and amp modeling without a computer load
- Guitarists who want a Hi-Z input alongside a mic preamp in one small box
- Buyers who want a bundled DAW and plug-in suite rather than buying software separately
Skip It If
- You record full bands or need more than two inputs at once
- You require a published gain figure in decibels before purchase
- You need balanced monitor outputs beyond the two TRS mains described
We may earn a commission at no extra cost to you.
Last verified: November 2026
Keep Reading
Related guides and picks on Mandrillis:
- Best Audio Interfaces for Home Recording : interfaces with clean preamps
- Why Is My XLR Microphone So Quiet? : fix low input levels
- Do You Need a Cloudlifter for Dynamic Mics? : extra gain for quiet mics
FAQs
About This Guide
Mandrillis Team
The Mandrillis editorial team researches and compares audio and music gear using manufacturer documentation, verified specs and real buyer feedback, so you can make a confident purchase without wading through marketing claims.
Read our full research methodology.